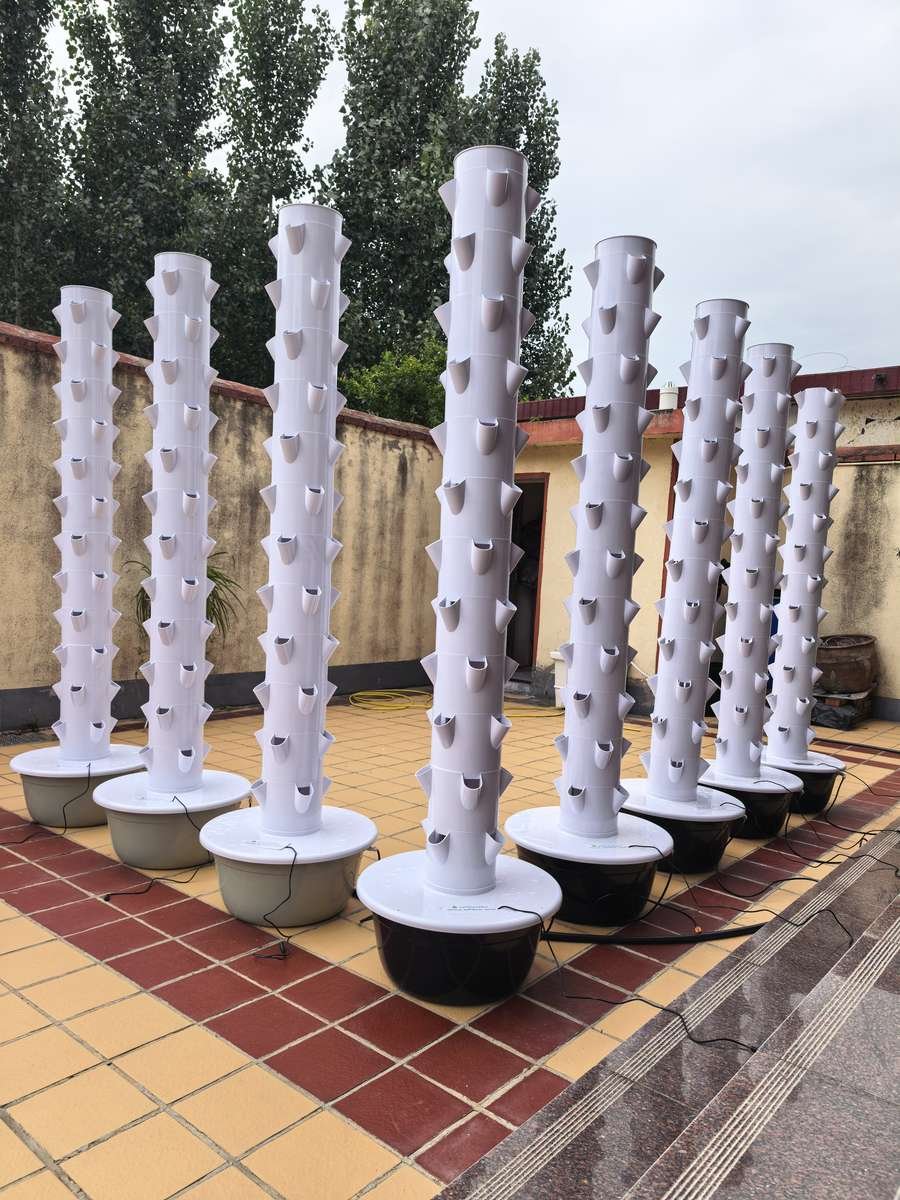
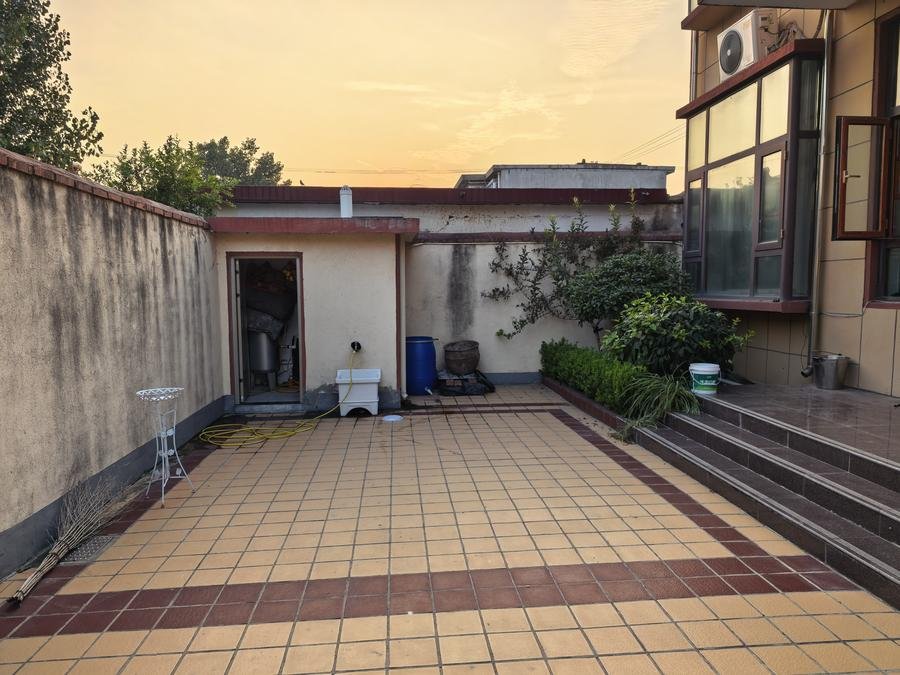
A tiled backyard courtyard, roughly 5 × 10 m (16 × 33 ft), an empty corner, and a garden tap. That is enough space to run a genuinely productive hydroponic operation — eight 12-layer towers, 384 planting sites, and a nutrient system that doses and refills itself.
We built exactly that system, and this guide walks through every decision in the order you have to make it: site selection, tower layout, reservoir sizing, pump sizing, gravity feed, and the A/B fertilizer dosing setup that keeps nutrient strength stable without daily mixing.
The site before the build: an empty tiled courtyard with a garden tap.
If you are a home grower planning your first backyard system — or a commercial grower who wants to prototype a layout at small scale before investing in 100 towers — the sequence below is identical. Only the numbers change.
1. What This 8-Tower Backyard System Actually Includes
The towers are the easy part. The system around them decides whether you spend 10 minutes a week on maintenance or two hours. Here is the configuration we built, at a glance:
Component
Specification
Towers
8 towers, 12 layers each, 48 planting sites per tower
Total planting sites
384
Tower height
207 cm (6 ft 9 in)
Tank per tower
30 L (7.9 gal) base tank with its own pump and float valve
Main reservoir
200–300 L (53–80 gal), elevated for gravity feed
Tower pumps
8 × 10–18 W, 800–1,200 L/h rated, 3 m (10 ft) design head
Nutrient dosing
2 proportional pumps (A and B), ratio 1:100
Stock solution
1 kg fertilizer dissolved in 20 L of water
Footprint
8–10 m² (85–110 sq ft) including the service aisle
Electricity
0.5–0.9 kWh/day, about $2–3 a month
The design logic is simple: nutrients follow water. Every litre of top-up water entering the main tank passes through the two dosing pumps and arrives at the correct strength. From there, gravity distributes it to the eight tower tanks. You never carry a watering can, and you never mix nutrients at the tower.
2. Site Selection: Sunlight, Surface, and Drainage
Three things break backyard hydroponic builds, in this order: too little sun, an unlevel surface, and nowhere for spilled water to go.
Sunlight: 6+ hours of direct sun for leafy greens and herbs, 8+ for fruiting crops. Watch the courtyard at 10 am, 1 pm, and 4 pm before you commit — a wall that shades the patio after 3 pm halves your production.
Surface: a 207 cm tower with a filled 30 L base tank weighs about 38 kg (84 lb). Eight of them means roughly 300 kg (660 lb) spread across your patio. Tiled, paved, or concrete is ideal. On soil, lay paving slabs under every base — an unlevel tower leans, and a leaning tower spills from the top ring.
Drainage: assume 5–10 L of spillage a week from top-ups, cleaning, and line flushes. Slope toward a garden bed, never toward a doorway.
Water source: a threaded tap within hose reach. In this design the main tank refills from that tap through the dosing pumps, so the tap stays connected permanently.
Power: an outdoor GFCI (RCD) protected outlet within 3 m (10 ft) of the main tank, plus capacity for eight small pump loads — about 1.5 A total at 120 V.
Wind: eight towers standing 2 m tall form a solid wall. A courtyard with a gap between buildings funnels wind straight into the rows, so anchor the back row to the wall and weight the front row bases before the first storm.
Eight 12-layer towers in two rows of four, with the service aisle kept clear for daily harvesting.
3. Layout: Placing Eight 12-Layer Towers
The mistake almost everyone makes is spacing towers for how they look empty instead of week six, when each one is a 60–70 cm (24–28 in) cylinder of foliage. With 12-layer towers the problem is worse, because the foliage reaches from the base tank to the top ring with no gap to reach through. Working numbers for eight towers:
Two rows of four, running parallel to the long wall
Center-to-center spacing: 80 cm (32 in) — 12-layer towers are bulkier than 7-layer models and the foliage closes the gap fast
Aisle between rows: 100 cm (39 in) minimum. You will walk this aisle every day and reach into it with a harvest basket, so do not shave it.
Distance from the wall: 60 cm (24 in) so you can inspect the back side of the rear row
Main tank and dosing station: at one end of the rows, not the middle. Gravity feed works best with short, equal-length runs, and you want the dosing pumps where you can see them.
Tower orientation: turn each tower so its sunniest face points into the aisle — that is the side you harvest from and check most often.
Total: about 4.5 × 2 m (15 × 7 ft) of growing area plus a 1 m service strip. On a 5 × 10 m courtyard this still leaves you a functional patio. For the per-tower and per-square-metre math behind that layout, see our guide to plant capacity, spacing & layout planning.
4. Reservoir Sizing: Two Tiers, Not One
Most guides describe a single reservoir. This system uses two, and the split is what makes it low-maintenance.
Tier 1 — the eight 30 L tower tanks
Each tower sits in its own 30 L (7.9 gal) tank holding the working solution that its pump circulates up through the 12 layers. These are small on purpose: if a tower develops a problem, you isolate 48 plants, not 384. Each tank has:
A small float valve that maintains the working level automatically as the plants drink. Water arrives by gravity from the main reservoir, so no electricity, no controller, and no pump to fail.
A submersible pump that lifts solution to the top ring, where it trickles down through all 12 layers and returns to the tank.
A removable lid to block light. An open 30 L tank grows algae in two weeks.
Tier 2 — the main reservoir
The main tank is the buffer that absorbs the difference between what the plants drink and what the dosers deliver. Size it for at least two days of summer transpiration. At 384 planting sites, expect 60–100 L of water per day in hot weather, so 200–300 L (53–80 gal) is the right range. A 200 L tank gives you two days of autonomy, keeps EC and pH swinging slowly, and stays deep enough that a week of neglect does not expose the plumbing.
Opaque or black, always lidded. Clear tanks grow algae, and algae consumes nutrients and clogs emitters.
Elevate it. It must sit at least 1 m (39 in) above the top of the tower tanks, on a proper stand or a sturdy shelf. Gravity feed depends on that height difference — if the tanks are level with each other, nothing flows.
Auto top-up with a float valve on the tap line. This is the trigger for the whole dosing system: when the level drops, mains water flows through both dosing pumps and arrives in the tank already dosed.
Drain tap at the lowest point. Full changes every 3–4 weeks are still necessary — siphoning 200 L by hand gets old fast.
Mark the fill level so a sudden drop (a leak) is instantly distinguishable from a slow one (the plants are drinking).
Keep it shaded. Solution above 24 °C (75 °F) holds less dissolved oxygen and invites root disease.
5. The A/B Fertilizer Dosing Pumps
This is the part that turns a hobby setup into a system you can leave alone for a week.
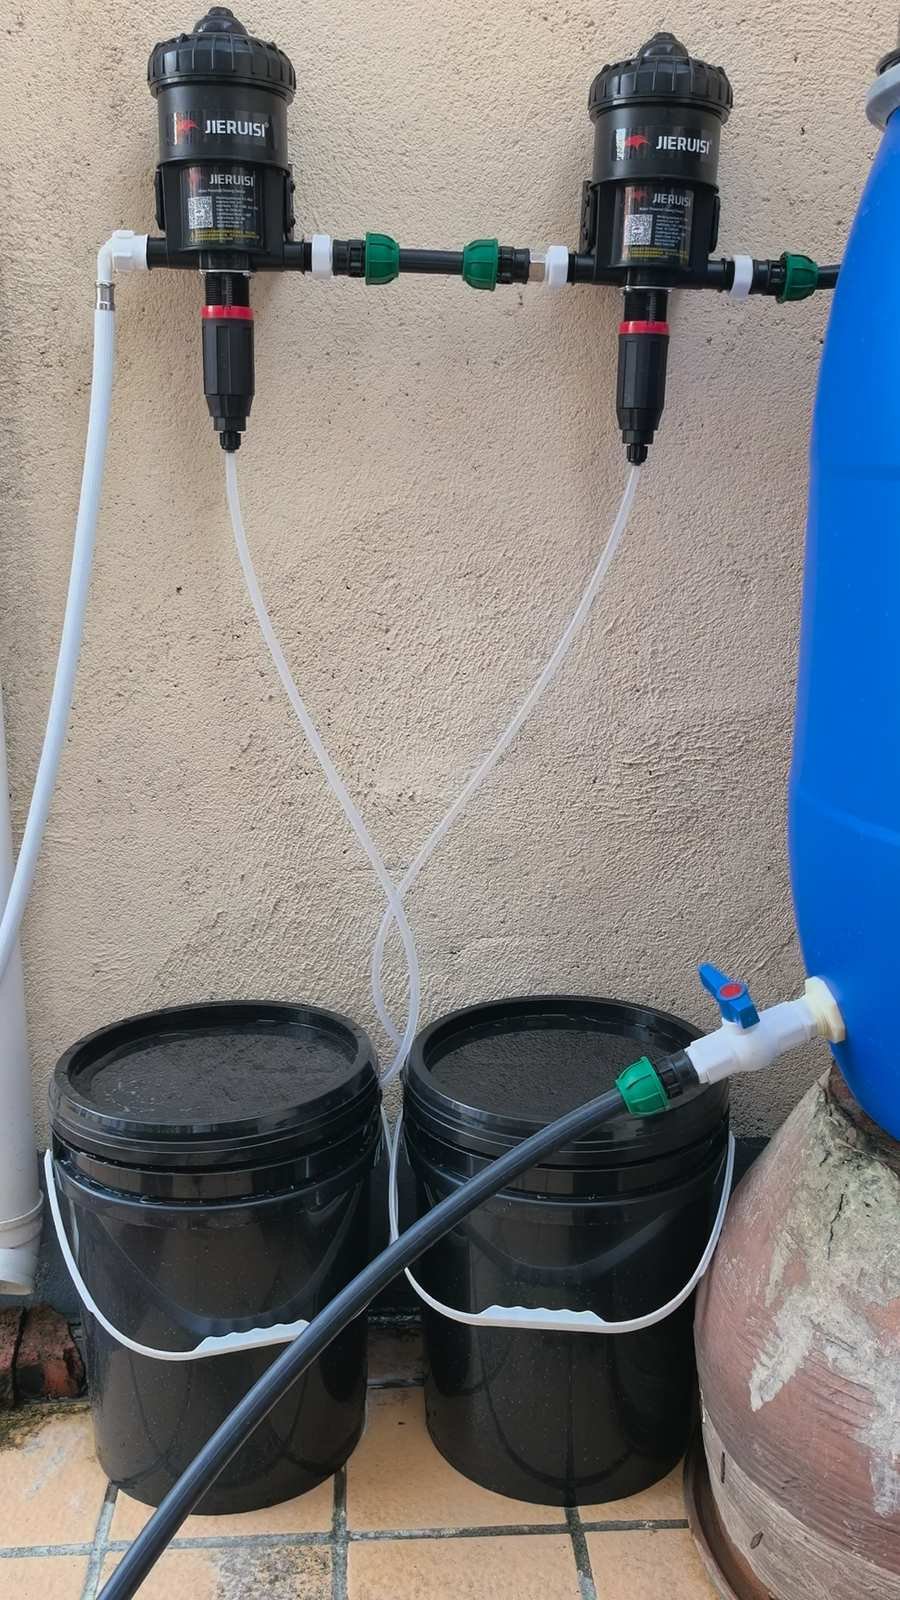
The A/B proportional dosing pumps on the fill line, fed from separate stock buckets.
Two proportional dosing pumps are installed inline on the main tank’s fill line — one for Part A, one for Part B of a two-part nutrient formulation. As mains water flows through to refill the tank, each pump draws its stock concentrate from a separate bucket and injects it at a fixed ratio. The water arrives in the tank at target strength, every time, with no measuring, no stirring, and no drift.
The stock solution recipe
Dissolve 1 kg of fertilizer in 20 L of water to make the stock solution, then set the dosing pump ratio to 1:100. That single recipe scales cleanly across the whole system:
Parameter
Value
Stock strength
1 kg in 20 L = 50 g/L (5% w/v)
Working strength at 1:100
0.5 g/L (500 mg/L) in the tank
Stock yield
20 L of stock makes 2,000 L of working solution — ten fills of a 200 L tank
Draw rate
10 mL of stock per litre of makeup water
Batch life in summer
20–33 days at 60–100 L of daily makeup
Two-part nutrients
Two separate 20 L batches — one for the A pump, one for the B pump
Installation rules that are not optional
Never combine A and B concentrates in one container. They are formulated with calcium and sulfate compounds that precipitate the moment they meet. Two pumps, two buckets, always.
Separate the injection points on the fill line by at least 30 cm (12 in), or inject A and B at two different points in the tank. Sequential injection into flowing water is what keeps them from reacting with each other instead of with your plants.
Run the pumps only with flow. Water-powered proportional pumps do this automatically. If you use electric metering pumps instead, wire them to a flow switch or a timer that only runs during fill, or you will over-dose a static tank.
Strain the suction lines. A 200-micron filter on each dip tube keeps sediment out of the dosing chambers. A blocked doser delivers water with no nutrients, which shows up as pale, hungry plants three days later.
Label everything. A and B buckets look identical at 7 am. Colour-code the tubing and never swap the heads.
Calibrate once a season. Fill a 10 L container through the doser, measure the injected volume, and correct the ratio. Proportional pumps drift, and a 20% drift is the difference between a healthy crop and tip burn.
Verify the strength on your first fill
The 1:100 recipe delivers 500 mg/L of fertilizer to the tank. Measure the resulting EC once, then tune your stock strength or ratio to hit your crop’s target:
EC: 1.2–1.8 mS/cm for lettuce, herbs, and leafy greens (roughly 600–900 ppm on the 0.5 scale); 2.0–2.8 for fruiting crops
pH: 5.8–6.2 — outside 5.5–6.5, iron and calcium lock out and new growth yellows
Water temperature: 18–22 °C (65–72 °F)
Check EC and pH in the main reservoir every 2–3 days for the first month, then spot-check the tower tanks once a week. If your readings keep drifting, our water quality and pH management guide walks through the correction workflow step by step. If a tower reads high, its float valve is not letting enough fresh solution in. If it reads low, you have a flow restriction.
6. Sizing the Tower Pumps
Each 30 L tower tank needs its own pump to lift solution to the top ring of a 207 cm tower. This is where builders either overbuy a 100 W pond pump that heats the solution, or buy a decorative 3 W pump that cannot reach layer 12.
Step 1 — total head. Tower height plus the height of the top ring above the pump, plus friction losses, plus a 20% margin: 207 cm (6 ft 9 in) + 30 cm (12 in) + 20–25% friction = 3 m (10 ft) design head.
Step 2 — flow. A 48-site tower wants 4–6 L/min (1–1.6 GPM) at the top ring — enough to wet every layer without flooding the bottom ones.
Step 3 — pick the pump off the right column. Never size from the “max flow” printed on the box; that figure is quoted at zero head. Look at the rating at 2 m and 3 m.
Per tower: 800–1,200 L/h (210–315 GPH) rated, delivering 300–400 L/h at 3 m head, 10–18 W
Impeller: magnetic drive rather than a sealed unit, with a removable intake strainer — it will collect root debris
Buy one spare. Pumps fail in July, not November. A spare on the shelf is the cheapest insurance in this entire build.
For the whole system: eight pumps at 10–18 W running at roughly 25% duty cycle is about 0.5–0.9 kWh a day. The dosing pumps only run while the tank fills, so their contribution is negligible.
7. Plumbing: Fill Line, Gravity Feed, and Circulation
Keep it boring. Backyard plumbing fails at joints, not in pipes.
The fill line (tap to dosing pumps to main tank)
13 mm (1/2 in) reinforced hose or PVC from the tap
Two proportional dosing pumps mounted on the wall, in series, injection points at least 30 cm (12 in) apart
Float valve in the main tank as the level control
A shut-off valve before the dosers so you can service them without flooding the patio
The gravity feed (main tank to eight tower tanks)
Main reservoir elevated at least 1 m (39 in) above the tower tank water line
20–25 mm (3/4–1 in) main line from the tank down to a distribution manifold — gravity systems are limited by pipe diameter, not pressure, and undersizing here is why tower 8 starves
A 6–8 mm (1/4–5/16 in) branch to each tower tank, each with its own small inline valve
Cut all eight branches to roughly the same length and keep the run sloping downward the whole way. Any flat or uphill section becomes an air lock and stops the flow entirely.
A mini float valve in each 30 L tank, set so the working level stays 5–8 cm (2–3 in) below the rim
The circulation loop (per tower)
Pump in the 30 L tank, up a vertical line to the top ring, then a gravity trickle through all 12 layers and back to the tank. Label the branch lines T1–T8 with a permanent marker — it saves 20 minutes every time you troubleshoot.
Leak test before you plant anything: fill everything, run the pumps for 24 hours with no plants, and check every joint with a dry paper towel. Finding a drip is trivial now and miserable once 384 seedlings depend on it.
8. The Timer: Running 384 Planting Sites Automatically
The tower pumps should not run continuously. Most tower designs do best with cycles — long enough to flood the root zone, short enough to let roots breathe. Starting schedule for leafy greens in a mild season:
15 minutes on, 60 minutes off, from one hour after sunrise to one hour before sunset
2–3 shorter overnight cycles (10 minutes every 3 hours) in hot weather
Cool weather: stretch the off time to 90–120 minutes
Use a timer with at least two programmable outlets and a rechargeable backup, and split the eight pumps across channels so a single failed channel does not take out all eight towers. Tune by watching the plants: if the lower layers feel dry between cycles, add time; if you see algae on the top ring or a permanent film of water, cut back.
The dosing and gravity feed need no timer at all — they respond to level, which is exactly why this design is stable. The plants drink, the tower tanks refill, the main tank refills and re-doses itself.
9. Power, Safety, and Weatherproofing
GFCI/RCD protection on every outdoor circuit. Non-negotiable when water and electricity share a patio.
Drip loops on all cables so water cannot run down a cord into a plug.
Mount the timer, power strip, and dosing pump controls off the ground, under a cover, at least 30 cm (12 in) up. Shelter the dosing station in particular — proportional pumps do not enjoy direct rain.
Anchor the towers. Tie the back row’s top ring to the wall with a strap and weight the front row bases. An 8-tower bank standing 2 m tall is not self-supporting in wind.
Winter: move indoors or run a reduced schedule. Towers survive a light frost if the solution does not freeze, but at 8–10 °C (46–50 °F) growth nearly stops. Plan for it rather than being surprised by it.
10. What an 8-Tower Auto-Dosing Build Costs
Typical budget, excluding the towers themselves:
Item
Typical cost
Main reservoir, 200–300 L, opaque with lid
$100–180
Elevated stand or shelf for the reservoir
$50–120
Two proportional fertilizer dosing pumps, A and B
$150–400
Eight tower pumps, 10–18 W
$130–280
Eight mini float valves plus main tank float valve
$40–80
Manifold, tubing, valves, clamps, filters
$60–120
Multi-channel timer and outdoor power protection
$40–80
Fertilizer, stock buckets, EC and pH meters, calibration solution
One-time setup lands between $740 and $1,570 for most builds at this scale, with running costs of roughly $2–3 a month in electricity plus fertilizer. Across 384 planting sites that is a fraction of retail greens pricing — the real return, though, is that you control the crop, the harvest window, and the variety mix.
11. The First 30 Days
Plant transplants, not seeds. Start with lettuce, bok choy, kale, basil, mint, and parsley seedlings. Seed starting in a tower works, but not while you are simultaneously learning the system.
Commission one tower first. Get tower 1 stable for a week — level holding, flow even, EC steady — before you commit all eight. Fixing a design flaw with 48 plants in it is far easier than with 384.
Verify the dosers on day one. Fill the main tank through the pumps and measure EC. If it lands in your target band, you have removed the single biggest failure mode from the system.
Walk the rows daily for two weeks. Leaf colour, standing water in the base tanks, spray pattern at the top rings.
Log EC, pH, and level on a sheet taped to the wall. A rising EC with a falling level means your top-up routine is leaking time — or a doser has drifted.
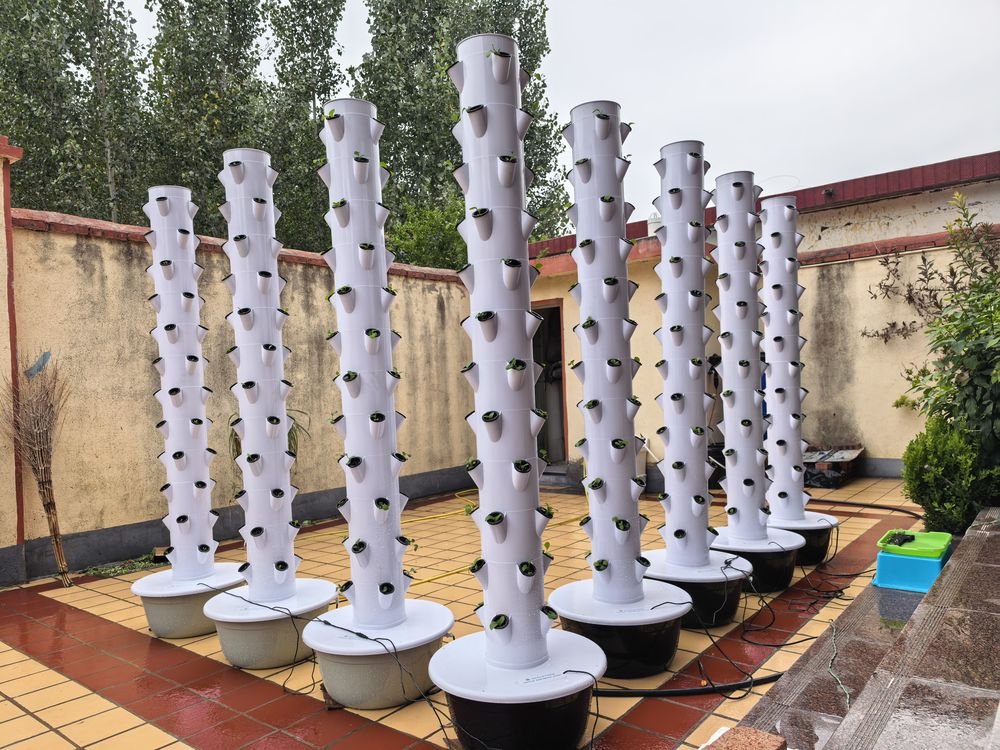
384 planting sites in production, fed by gravity from one elevated main reservoir.
12. Five Mistakes That Ruin a First Backyard Build
Level reservoirs. If the main tank is not higher than the tower tanks, gravity delivers nothing. Elevate it properly.
Mixing A and B concentrates. Guaranteed precipitation, blocked lines, and a nutrient solution your plants cannot use.
Under-sizing the branch lines. Gravity feed needs diameter. Thin tubing to eight tanks means the far towers run dry while the near ones overflow.
Continuous 24/7 pumping in a system designed for intervals. Roots stay saturated, oxygen drops, and rot follows.
No float valves. Without them you are manually checking eight tanks a day — which defeats the entire point of the design.
13. Weekly Maintenance: 20 Minutes
Check main reservoir level and the fill float valve operation
Test EC and pH in the main tank; spot-check one tower tank
Confirm the dosing pumps are drawing from both stock buckets (a blocked dip tube is silent)
Check the stock buckets — a 20 L batch lasts roughly 3–4 weeks in summer, so refill before it runs dry
Inspect each tower’s top ring for even flow
Clear the pump intake strainers and return filters
Check leaf undersides for pests; remove yellow or damaged leaves
Look at every joint and float valve for drips
Every 3–4 weeks: full reservoir change, line flush, and doser calibration check. For the complete daily, weekly, and monthly schedule see our hydroponic tower maintenance checklist.
Start Smaller Than You Think, Then Scale
Eight 12-layer towers, 384 planting sites, one main reservoir, eight float valves, and two fertilizer dosing pumps running 1 kg of fertilizer per 20 L of stock at 1:100. Build it once with correct spacing, correct reservoir elevation, and correctly sized pumps, and the system runs on its own — the dosers follow the water, the floats follow the plants, and your job drops to a 20-minute weekly walkthrough plus staggered planting.
The same architecture scales directly. Run the 8-tower version for a season and you already know how to plan a 50- or 100-tower commercial system (our 100-tower farm setup guide covers the full scale-up): it is this build repeated, with a larger main reservoir and a manifold instead of eight branch lines.
Planning a system — backyard or commercial? Tell us your space, your crop, and your target volume, and we will recommend the tower configuration, reservoir volume, dosing setup, and pump specification that fit it.